Portal & Authorization
Creating an application
Before you can access any of the API endpoints, you need to create your app in our developer portal and obtain its API Token.
Please follow these steps to create an application:
- To access the developer portal, please visit the Dashboard.
- On the guild selection page, scroll all way down to the bottom and click Developer Portal.
- Click the blue New app button.
- Please enter your application's name and add a URL to your app's hosted logo. Both should be easily recognizable to your users to simplify subsequent authorization processes.
- Please select if the app should be private. Private apps can only be added to guilds by the owner of the app.
- Hit Save.
Congratulations, you created your first app in our system! An API token has been generated for you, and you can reveal or copy it by clicking the respective buttons in your app box.
Authorizing your app
To allow your application to access any data, it must, in any case, be authorized by each guild you want to access. If you want to perform actions on behalf of users, you need their authorization as well.
Let's have a look at both cases.
Authorizing an app on a guild
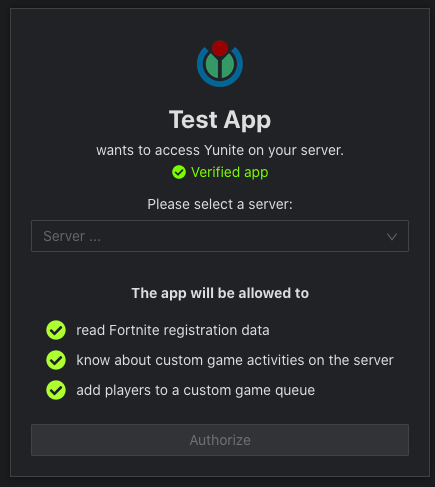
To access a guild and its users' data, it's required that the guild's administrators opt into that access. You can request this consent by forwarding a guild administrator to an Authorization Page, which looks very much like a simplified OAuth page.
To generate a link to this page for your app, please follow these steps:
- Click the button Create authorization link in your app box - this will spawn a small helper tool to create an authorization link for you.
- Leave the selector at the top on Guild.
- Choose the permissions your app needs to work. Do not request more permissions than you need to make a reputable impression to our users. If you need more permissions, you can later route the admins through the authorization page again. Don't be greedy.
- Copy the link at the bottom. You can use the same link for all guild authorization flows as the admins can select which server they want to authorize on the Authorization Page.
The Authorization Page will look like this and help our users understand what data your app can access and which actions it can perform. If they agree with your request, they only need to click the Authorize button, and your API token is immediately authorized to access the requested endpoints for that guild.

Checking your app's status
We provide an endpoint to get your app main base data and a list of guilds it's authorized on, alongside with its respective permissions on each of them.
Like all API requests, this request must be authenticated. Please refer to Authentication to learn more.
https://yunite.xyz/api/v3/app- Request
- Response
| Name | Value type | Description |
|---|---|---|
| withGuildNames | boolean as string | Set to true if you want to receive guild names and avatars with your response; do not add it or set to false if guild IDs are enough. Note that enabling this will significantly slow down your request |
- Schema
- Example
{
    "type": "object",
    "properties": {
        "app": {
            "type": "object",
            "properties": {
                "id": {
                    "type": "string",
                    "value": "ID of your app"
                },
                "name": {
                    "type": "string",
                    "value": "Name of your app"
                },
                "ownerId": {
                    "type": "string",
                    "value": "Discord ID of app owner"
                },
                "imageUrl": {
                    "type": "string",
                    "value": "The image URL you provided for the app"
                },
                "isVerified": {
                    "type": "boolean",
                    "value": "whether or not your app is verified"
                },
                "publicApp": {
                    "type": "boolean",
                    "value": "whether or not your app is public"
                }
            }
        },
        "authorizedGuilds": {
            "type": "array",
            "itemSchema": {
                "type": "object",
                "properties": {
                    "guildId": {
                        "type": "string",
                        "value": "ID of the guild"
                    },
                    "guildName": {
                        "type": "string",
                        "value": "name of the guild; only present if you set withGuildName to true"
                    },
                    "guildAvatar": {
                        "type": "string",
                        "value": "URL of the guild avatar; only present if you set withGuildName to true"
                    },
                    "permissions": {
                        "type": "array",
                        "itemSchema": {
                            "type": "string",
                            "value": "permission identifiers"
                        }
                    }
                }
            }
        }
    }
}
{
"app": {
"id": "123456789",
"name": "BestApp",
"ownerId": "987654321",
"imageUrl": "https://not-a.real.url/image.png",
"isVerified": false,
"publicApp": true
},
"authorizedGuilds": [
{
"guildId": "38427983492334",
"guildName": "Cool server",
"guildAvatar": "https://cdn.discordapp.com/....",
"permissions": [
"READ_REGISTRATION",
"BLOCK_USERS"
]
}
]
}You can remove a guild from your app by un-authorizing it. Note that this is not permanent, unlike a ban - imagine it like a kick.
https://yunite.xyz/api/v3/app/deauthorize?guildId={guildId}Query Parameters| Name | Value type | Description |
|---|---|---|
| guildId | snowflake as string | The id of the guild you want to remove from your app |
It will respond with code 200 if the guild was removed or 404 if the guild has not authorized your app.
Authorizing an app to perform actions on behalf of users
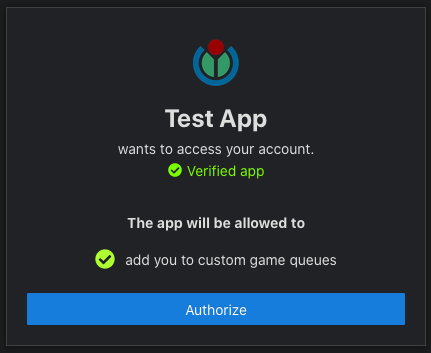
To act on behalf of a user, every user you want to do this must opt into these operations. The flow is extremely similar to authorizing a guild. Please follow the steps above again, but change the selector mentioned in step 2 to User. Then, you can again choose the required permissions and copy the link. That link will be the same for all users as they need to authenticate themselves with their Discord account beforehand.
